
Minecraft build guide
Minecraft Iron Farm: 7 Safe Steps for Java and Bedrock
A Minecraft iron farm works best when you test one small cell before building a tall, complicated tower. Start with a protected villager area, the beds and workstations your edition expects, a controlled spawn platform, and a simple water-and-hopper collection line. This guide keeps the layout easy to inspect so you can find a linking or spawning problem before it costs a main survival world.
Mechanics can change between Java, Bedrock, and game releases. Treat the diagrams on this page as an editorial plan, then verify the current edition and version in a copied world before expanding the farm.

Quick answer
What Does a Minecraft Iron Farm Need?
A dependable Minecraft iron farm needs a valid village-like setup for your edition, a safe place for villagers to sleep or link to their points of interest, an iron golem spawn area, and a collection system. The exact counts and distances are not universal: Java and Bedrock use different village and spawning rules, and a recent update can change a design that worked in an older release. The useful first goal is a farm that produces one test cycle in a copied world, not the highest possible rate.
Prepare building blocks, beds, the workstations required by the design, glass or fences for a visible villager chamber, water buckets, signs or gates for water control, hoppers, and at least one chest. Keep spare blocks and a way to move villagers safely. A zombie scare design is a separate choice, not a requirement you should add automatically; if you use one, make the line of sight reversible and test that villagers can still follow the edition's work and sleep rules.
The biggest mistake is treating a popular Java layout as a Bedrock blueprint. Before copying a tutorial, write down the edition, Minecraft version, number of villagers, bed arrangement, workstation arrangement, spawn surface, and collection method it assumes. Then change one variable at a time. That record turns an iron farm from a mysterious redstone build into a small system you can diagnose.
Villager cell
Keep each villager visible and protected while you confirm beds, workstations, and movement are linked to the intended cell.
Spawn surface
Give golems one deliberate area to appear, then remove nearby blocks and water pockets that create competing locations.
Collection line
Use water, hoppers, and a chest only after the spawning test works; a blocked hopper can look like a failed farm.
Version note
Record Java or Bedrock and the game version beside the build so a future update does not silently change your assumptions.
Build sequence
How to Build a Minecraft Iron Farm in 7 Steps
Build the smallest testable version first. The order below separates village linking, spawning, and collection so each layer can be checked on its own.
1. Choose a quiet test site
Pick a location away from natural villages, extra beds, and nearby workstations. A raised platform or open coastline makes unwanted spawn spots easier to see. Build the first version in a copied world or a temporary survival area, and leave a walkway around every chamber so you can inspect it without breaking the farm.
2. Write the edition and version on your plan
Before placing blocks, note Java or Bedrock, the game version, and the tutorial assumptions you are following. The phrase iron farm covers several designs. A layout that relies on a Java village center may not behave the same way in Bedrock, so keep the edition check visible in your notes and in the final test.
3. Build a protected villager chamber
Move villagers one at a time and close every escape route before adding the next one. Leave enough room to see their faces, beds, and workstations. Do not mix the test chamber with a trading hall until the farm works: an unrelated workstation or bed can be claimed by the wrong villager and make the result impossible to read.
4. Add beds and workstations deliberately
Place the beds and workstations required by the chosen design, then watch which villager claims each point of interest. Let the villagers complete the normal linking or work cycle for your edition. If a link looks wrong, remove competing blocks and test again before adding a scare device, decorative roof, or second cell.
5. Build one controlled spawn area
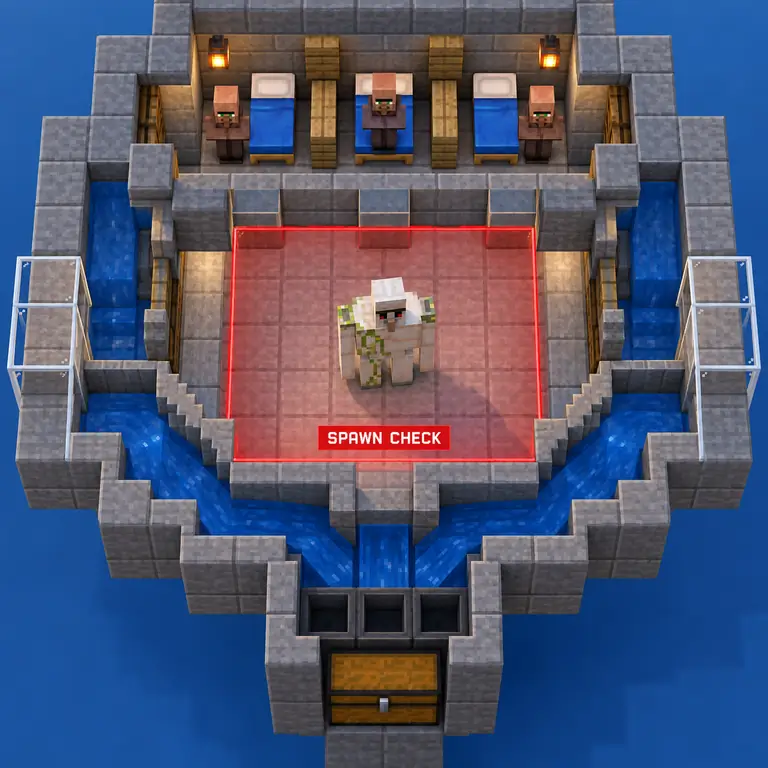
Create a flat, well-lit or otherwise intentional platform according to the design. Keep the edges, roof, water channels, and nearby caves in mind: a golem that appears outside the collection route can make a working farm look empty. The spawn-check illustration is a reminder to inspect the whole area, not just the block under the villagers.
6. Add water and collection
Once a golem appears in the intended area, add signs, gates, or walls to guide water toward hoppers and a chest. Test every hopper with a single item and make sure the chest is reachable. If the farm stops after collection is added, temporarily remove the water and return to the last known working state.
7. Run a one-cycle acceptance test
Stay nearby long enough to observe a complete cycle: villagers remain linked, a golem appears in the target area, water moves it to the kill or drop zone, and iron reaches the chest. Write down the result, the time, and the edition. Only then duplicate the module or add rate improvements.
Troubleshooting view
Check the Spawn Area Before Rebuilding the Villager Room
When a farm produces no iron, players often move beds or replace villagers first. Start with the visible spawn area instead. Look above, below, and beside the platform for a second valid surface, a water pocket, a cave, or a roof that changes the available space. If a golem appears outside the intended route, the village logic may be working and the collection boundary is the real problem.
The illustration marks a single spawn zone in red so the diagnosis is concrete. It is not a universal block count. Compare its shape with the rules of the design and your edition, then remove one competing surface at a time. Keep the villager chamber unchanged while you test; changing villagers, beds, spawn blocks, and hoppers together removes the evidence you need.
A useful log has four entries: the exact edition and version, which villagers linked to which beds or workstations, where the first golem appeared, and whether an item reached the chest. That small record is more reliable than a screenshot of a finished tower because it tells you which layer failed.
Edition check
Java vs Bedrock Iron Farm Checks
Use this table to decide what to verify. It intentionally avoids promising one universal layout or rate.

Edition boundaries
Do Not Copy a Java Iron Farm Into Bedrock Without Retesting
Java and Bedrock can share the words villager, bed, workstation, and iron golem while still producing different farm behavior. The differences matter most around village identity, point-of-interest linking, golem spawning, and the space that counts as a valid target. That is why a design should be labeled by edition and version instead of being advertised as a universal three-villager recipe.
The comparison graphic shows two concept layouts, not official game screenshots. Use it to ask the right question: which parts of this design are structural, and which parts depend on the edition? Open the current version notes before a large build, then reproduce the smallest working test in the edition you actually play. If the test fails, keep the edition-specific page or tutorial nearby and do not repair it by adding random beds or villagers.
A rate claim also needs context. Distance from the player, simulation or render settings, nearby caves, other villages, and collection downtime can all change the observed output. Report your own one-cycle test and the version you used rather than copying a number that belongs to another release.
Common failure modes
Why a Minecraft Iron Farm Is Not Working
Change one layer at a time so the cause stays visible.
No golem appears
Check edition, villager links, beds, workstations, and the time needed for the normal cycle. Do not add more villagers until the current links are understood.
Golem appears outside
Inspect roofs, caves, nearby platforms, and water pockets. Mark or remove competing surfaces before rebuilding the chamber.
Iron never reaches the chest
Trace the water path, hopper orientation, and drop zone with one test item. A collection fault can hide a healthy spawn system.
Rates change after expansion
Keep the original cell unchanged and add one module at a time. Record the new beds, workstations, distance, and version before comparing output.
Continue learning
Guides That Help With the Same Setup
Use these pages for edition choice, villager workstations, equipment planning, and version checks around an iron farm.
Java vs Bedrock
Compare the edition rules before you copy a farm layout.
Compare editionsVillager trading hall
Review workstation linking before you place villagers near a farm.
Review villager setupMinecraft enchantments
Plan iron, tools, and books as part of a longer survival setup.
Plan equipmentVersion notes
Check release context before trusting an older farm tutorial.
Check versionsSource note
Use Release Notes for Version-Sensitive Checks
The official Java 26.3 article is linked for release context. It does not replace an edition-specific farm test or guarantee a fixed design.
Minecraft Java Edition 26.3
Read the official release note, then retest the farm in the version you actually play.
Open official release noteFAQ
Minecraft Iron Farm FAQ
How many villagers does a Minecraft iron farm need?
There is no single number that works for every design and edition. Follow the chosen tutorial's assumptions, start with its smallest test cell, and confirm villager, bed, workstation, and village links before expanding.
Can I copy a Java iron farm to Bedrock?
Not safely without retesting. Java and Bedrock can differ in village identity, point-of-interest linking, spawn space, and timing. Treat a Java build as a reference for concepts, then use a Bedrock-specific plan and a copied world.
Do I need a zombie for an iron farm?
Only if the specific design uses a scare mechanic. A zombie is not a universal requirement. If you add one, make the sight line reversible and confirm that villagers still meet the edition's normal sleep and work conditions.
Why is my iron farm spawning golems outside the platform?
Search the full area for other valid surfaces, caves, roofs, water pockets, or nearby village structures. Remove one competing location at a time and keep the villager chamber unchanged while you test.
How can I make an iron farm faster?
First document one complete cycle. Then improve one variable, such as collection downtime or a competing spawn surface, and measure again. A larger build without a controlled baseline is difficult to diagnose.
Is this an official Minecraft farm design?
No. The diagrams on this page are original editorial illustrations. They explain the relationships to inspect; the game, edition, version, and chosen tutorial determine the blocks and counts you should use.